» Spherometer (0738)
Immagini
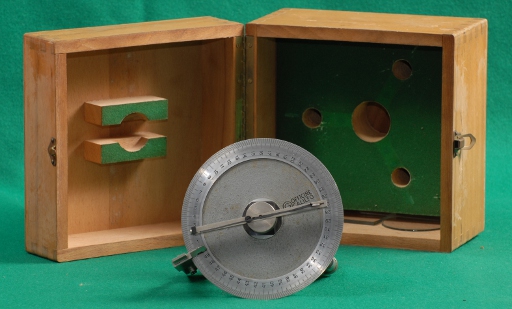
DESCRIPTION
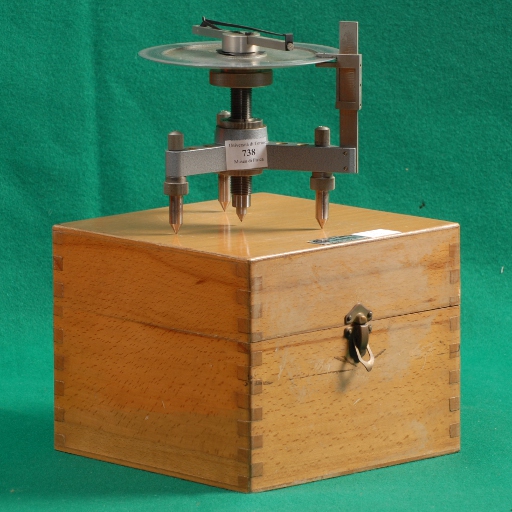
Exhibit 738 is a spherometer, a mechanical instrument that facilitates the determination of the thickness of thin objects or the radius of curvature of a surface.
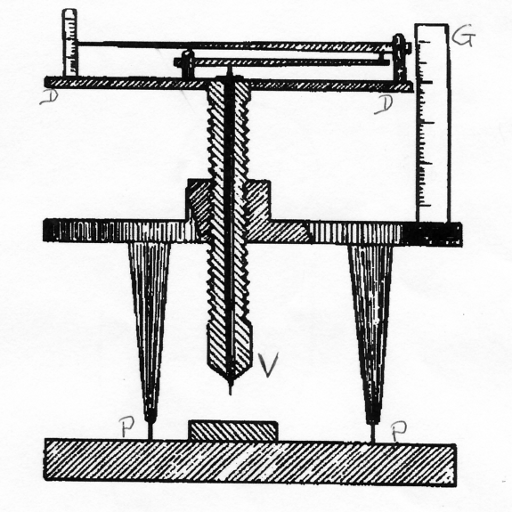
It consists of a tripod in which the foot contacts are at the vertices of an equilateral triangle. The tripod supports a micrometric screw V with axis perpendicular to the plane PP of the three contact points and with disk D at the top.(design-1). By turning the disk D the screw rises and lowers. The edge of the disk makes contact with a vertical column G graduated in mm and based on one of the tripod legs. The pitch of the screw is one mm so that a revolution of the upper disk D moves the contact point of the screw by one mm. The disk D is divided into 500 parts so the sensitivity of the measurement is 1/500 of a mm.
In this instrument (see photo-1) there is a lever that amplifies the vertical displacement of the screw D. When the point of the screw comes in contact with a hard surface and therefore cannot advance, the horizontal lever rises. Now one rotates the disk until the lever coincides with the fixed index to obtain the pertinent measurement.
Measurement of a thickness
One rests the object whose thickness is to be measured on a flat glass plate and under the spherometer. One rotates the micrometric screw D until contact is made and one reads the measurement on the vertical ruler and on the disk. Then one measures the zero point of the spherometer by removing the object and repeating the above measurement. The difference between the two values is the thickness of the object.
Measurement of the radius of curvature of a spherical surface.
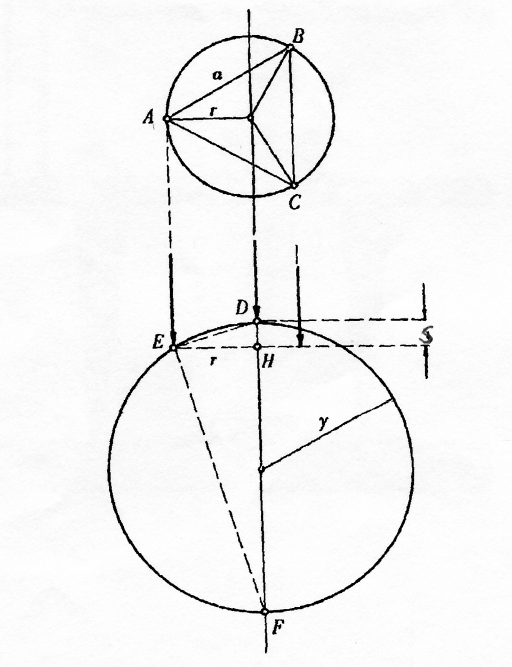
It is necessary to know the side a of the equilateral triangle or the radius r of the circumscribed circle (see design 2) where![Formula: [r = a/\sqrt{3}] Formula: [r = a/\sqrt{3}]](/foto/equaz/738_fr01.png) ). In this instrument: r = 50,00 ± 0,02 mm.
To effect the measurement, one places the tripod on the spherical surface of which one desires the radius of curvature. The height of the dome under the spherometer is then HD = s when contact is made with the spherical surface.
Then repeat the zero depth measurement as above.
If y is the radius of the entire spherical surface then a straightforward analysis of the triangle DEF yields
). In this instrument: r = 50,00 ± 0,02 mm.
To effect the measurement, one places the tripod on the spherical surface of which one desires the radius of curvature. The height of the dome under the spherometer is then HD = s when contact is made with the spherical surface.
Then repeat the zero depth measurement as above.
If y is the radius of the entire spherical surface then a straightforward analysis of the triangle DEF yields
![Equazione: [r^2= s(2y-s)] Equazione: [r^2= s(2y-s)]](/foto/equaz/738_eq01.png)
and therefore
![Equazione: [r^2= 2sy-s^2 ] Equazione: [r^2= 2sy-s^2 ]](/foto/equaz/738_eq02.png)
![Equazione: [2sy = r^2 + s^2 ] Equazione: [2sy = r^2 + s^2 ]](/foto/equaz/738_eq03.png)
![Equazione: [r^2\frac{a^2}{3} \xRightarrow 2sy=\frac{a^2}{3} +s^2] Equazione: [r^2\frac{a^2}{3} \xRightarrow 2sy=\frac{a^2}{3} +s^2]](/foto/equaz/738_eq04.png)
![Equazione: [y=\frac{a^2}{6s} + \frac{s}{2} = \frac{a^2+3s^2}{6s}] Equazione: [y=\frac{a^2}{6s} + \frac{s}{2} = \frac{a^2+3s^2}{6s}]](/foto/equaz/738_eq05.png)
ISCRIZIONI
- Sul metallo è inciso "OFFICINE GALILEO"
Dati Catalografici
| Data di costruzione: | Prima metà XX Secolo |
|---|---|
| Data di carico: | Ignota |
| Nr. Inventario: | Ignoto (Ignoto) |
| Costruttore: | Officine Galileo |
| Materiale: | legno, metallo |
| Dimensioni: | Scatola: 170 mm x 170 mm x 185 mm |
| Conservazione: | buono |
